Update Information from Power BI Report and Achieve Live Data Write-Back to Fabric Data Warehouse Using Power Apps & Power Automate
How to Update Data from Power BI Report, Write-Back Data to Fabric Data Warehouse, and Visualize Live Data Using Power Apps, Power Automate, and Direct Lake
Introduction
Inspired by the insightful article from Jon Stjernegaard Vöge, I explored integrating the Power Platform with Microsoft Fabric to enable live data write-back capabilities.
This article provides a step-by-step guide for creating a seamless workflow by firstly embedding a Power Apps within a Power BI report. Users then can select a data item from the Power BI report, update it through the embedded Power Apps, and send these updates to the Fabric Data Warehouse SQL endpoint using Power Automate. Thanks to Direct Lake semantic models, these updates are reflected in real-time within Power BI, streamlining interactivity for dynamic, up-to-date data handling.
Steps:
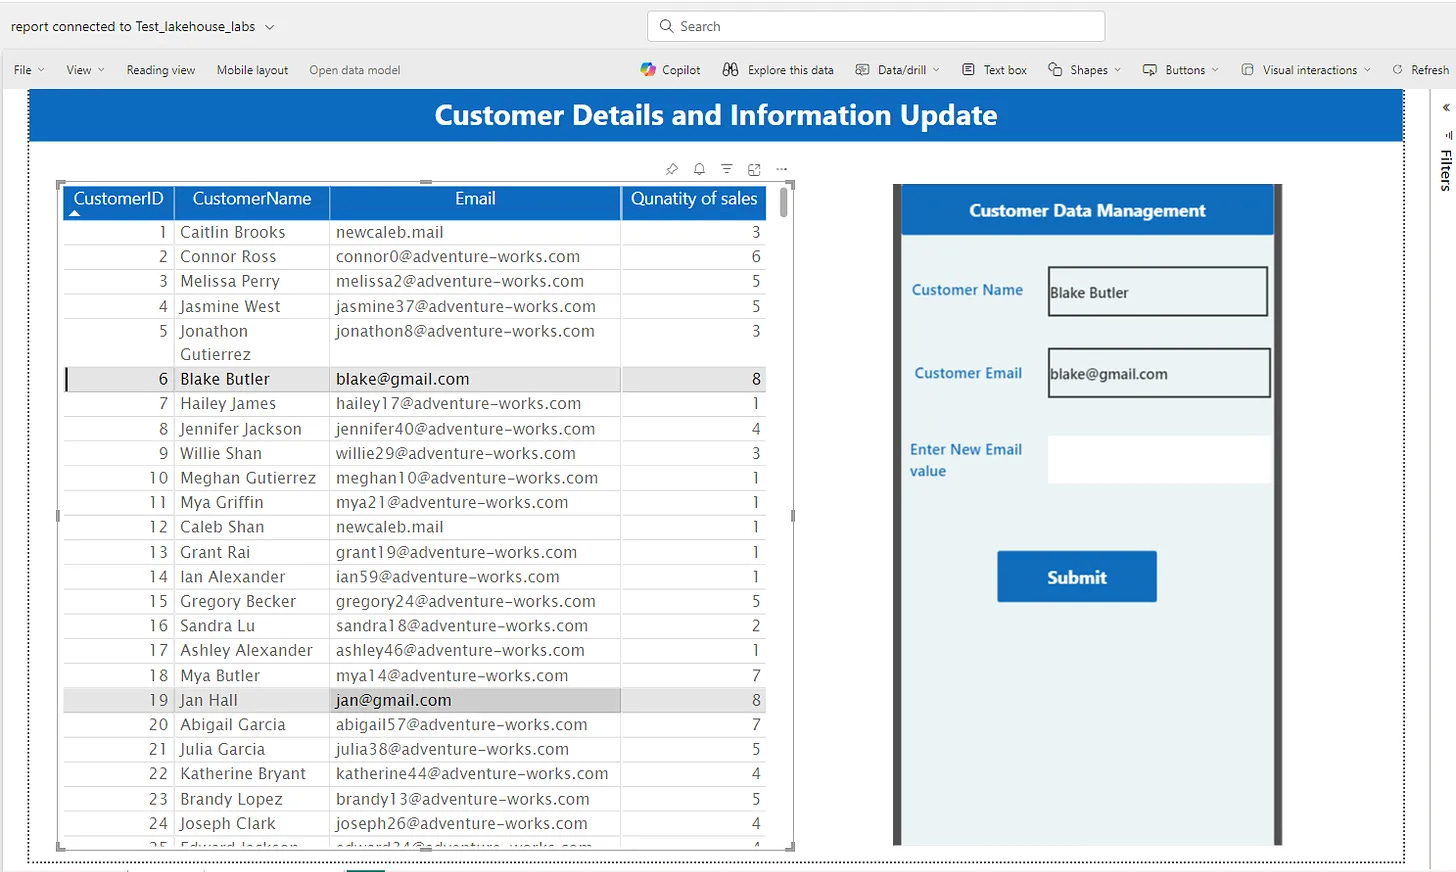
With Power BI, Power Apps, and Power Automate, I created an interactive report that allows viewing and updating customer details information in real-time.
Below are the steps to accomplish this using a Fabric Data Warehouse for storing data and a semantic model in Direct Lake mode to visualize live data.
Step 1: Data Preparation
Data Source: Use a Fabric Data Warehouse to store customer information, providing a scalable environment for data in OneLake, enabling T-SQL write operations.
Semantic Model: Create a semantic model from the Fabric Data Warehouse using Direct Lake mode. This mode enables real-time interactions with the data, ensuring updates are reflected immediately without scheduled refreshes.
Step 2: Creating the Power BI Report
Report Setup: Start by creating a Power BI report that uses a Live connection to the previous Semantic Model. This connection allows you to leverage the real-time capabilities of Direct Lake.
Report Example: In my example, I created a simple report displaying customer information. The goal is for a user to select a specific customer from the report and update their details directly within Power BI.
For instance, a user could change the customer's email, with the changes being written back to the Data Warehouse and reflected in real-time thanks to Direct Lake mode.
Here is the report lineage:
Step 3: Integrating Power Apps into Power BI
Adding Power Apps: In Power BI, add a Power Apps visual to your report and click on "Create a new app". This action will open Power Apps in a new browser tab, where you can design an app specifically for modifying customer details.
Step 4: Creating the Power Apps Application
App Design: In this example, the Power Apps application has a simple interface to update the selected customer's email, filtered from Power BI. The apps include a text input field for entering the new email, allowing the user to make changes.
Data Integration: Ensure the PowerBIIntegration object is visible in Power Apps to interact with the data passed from Power BI. Use PowerBIIntegration.Data to access this data.
For example, set the
Textproperty of a Text Label toPowerBIIntegration.Data.YourItemto display data from Power BI.
To write back these changes to the Data Warehouse, the app will call a Power Automate flow.
Submit Button: Add a Submit Button to save the new data entered. Set the button’s
OnSelectproperty to trigger a Power Automate flow, which will save the new data back to your Data Warehouse.
Step 5: Designing the Power Automate Flow to Write back to the Data Warehouse:
Connect Power Automate to the Fabric Data Warehouse: Set up Power Automate to connect to the same Data Warehouse as Power BI, using the SQL Server Data Connector.
Provide the connection details, including the actual name of the Data Warehouse, and use the SQL connection string as the Server Name.
Copy the SQL connecting string from the data warehouse
Trigger Flow from Power Apps: Configure the flow to be triggered from Power Apps, passing dynamic input variables for flexible data handling.
Add parameters for dynamic updates to the Data Warehouse based on user inputs from the Power Apps.
Handle Data Write-Back: Configure the flow to execute a SQL query that updates the customer information based on the changes made in the Power Apps application. This ensures that the data is written back to the Data Warehouse
Use actions like "Execute a SQL query" to perform operations such as INSERT, UPDATE, or DELETE.
In this example, I used an UPDATE SQL query to update the customer email field with the input from Power Apps.
Step 6: Returning to Power BI
Final Integration: After setting up the Power Apps application and Power Automate flow, return to Power BI. The Power Apps application is now integrated into the Power BI report.
User Interaction: Users can select a customer from the report, modify their details using the embedded Power Apps interface, and see the updates reflected instantly in the report, thanks to the real-time data connection provided by Direct Lake.
Note: The solution works with Direct Lake semantic models, but there might be a slight delay as the model reframes to show new data.
By connecting Power Apps with your Data Warehouse using the SQL Server Data Connector and leveraging Power Automate to handle data write-backs, you can create a powerful and dynamic data management solution inside Power BI.
Conclusion
By following these steps, you can create a dynamic and interactive Power BI report that allows real-time updates directly within the Power BI report.
Integrating Power Apps and Power Automate with Power BI provides a powerful solution for writing back data to OneLake using SQL commands.


